
This is a part of my article “Sharpen your axe with BackTrack – Gathering phase” published on PenTest Magazine and Hakin9 magazine. I have the right to do up to 100 downloads of these magazines, so If you are interested on it you can download PenTest Extra BackTrack Compendium 03_20132 or Hakin9 starter kit 03_20131 for free using the 2 following links. The only thing you need is a free registration.
– PenTest Extra Compendium
– Hakin9 Starter kit.
– PenTest OPEN 06/2013.
Sharpen your axe with BackTrack – Gathering phase [Part 2]
Find your account
As for the hosts, users discovering can be done using many methods. You can scan Google searching for email accounts of your target company, explore corporate Web pages looking at pdf or word documents and who are the creators of this documents; if you have access to the LAN you are testing, you can try to get information from SNMP or SMTP protocol. Below are some scripts and programs that will help you, present in BT.
The harvest, by Edge-Security Research, is a very useful one. It searches for a company name in various resources database (Google, Linkedin, PGP, Bing) and can be used to extract probable username. In Figure 5 you can see the result of a research: maybe vdiaz, cdelojo, cmartorella, and xmendez are also FTP, SSH or RDP users.
Again by Edge-Security.com, you can use metagoofil (/pentest/enumeration/google/metagoofil/) to try to find users that create documents, downloadable from the domain you point at, such as docs or pdfs.
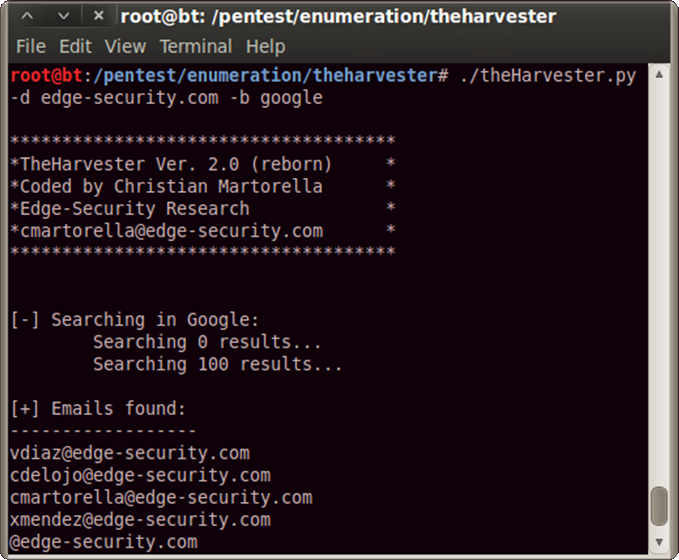
Figure 5
As well as using Web search to catch company users’ names/usernames, you can try to obtain information by SNMP or SMTP.
SNMP is a protocol based on UTP that is often used to monitor server service status. The authentication methods (community strings) are passed in clear and often have the default state (public or private), so you can easily try to find it in order to get many information.
You can use programs such Snmpenum and Onesixtyone for this. Let’s see how they work.
Initially you have to use Onesixtyone to enumerate comunity strings; with the info collected before, make a list of hosts and write it down to a file (/tmp/hosts.txt), then point to pentest/enumeration/snmp/onesixtyone and do the following:
In this command you use a file dict.txt, already present in the onesixtyone folder, to ‘brute force’ the community strings; you use the hosts file you have found before to set targets and, at the end, make a log file.
In Figure 6 you can find a sample of what you can get. In the sample you see some printers, some switches and a server (192.168.1.10).
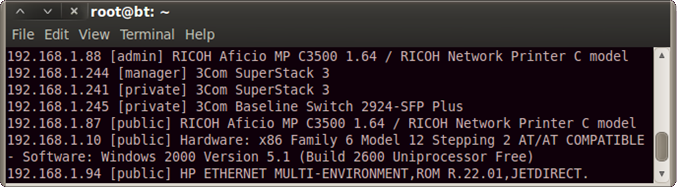
Figure 6
Go on and use snmpenum over 192.168.1.10 setting ‘public’ as community string, and the windows.txt template (already present) to merge output information (see Figure 7).
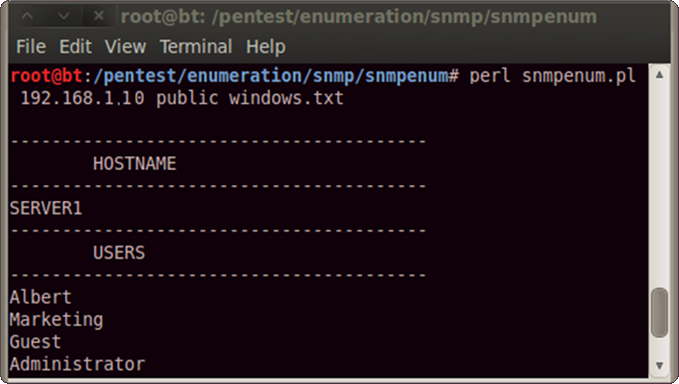
Figure 7
This is just a sample, but you can get much more information than these using SNMP. You can find processes running, opened ports, system information and much more.
For now, limit yourself to the users. What you want is to create a document like hosts.txt but with possible user names.
There are many other methods to identify users such as using SMTP server (smtpscan) and try to test the VRFY functionality (smtp-user-enum). Spidering a target website to collect unique words (/pentest/password/cewl) or sniffing network traffic (Wireshark) can also be useful. In the Backtrack > Information Gathering > Network analysis menu you can find many tools to reach your target. Try to find as many names as you can, but do not forget to add to your list the most common user names (root, admin, administrator).
Map the NET
Let’s have a look at network scanners, limiting us to a simple scan, with the only objective to find some services that can be used as a target.
Please, make sure to keep in mind that scanners are much more than what you will read here.
Of course, NC can be used as a network scanner, but the best programs are Unicorscan and Nmap so let’s start with the first one. The commands in Figure 8 perform a simple scan, pointing at a single target (192.168.34.135), testing common TCP (-m T) and UTP (-m U) ports, typically those used by common services such as FTP, SSH, SMB, MySQL. The last command in Figure 8 is a scan of all the subnet 192.168.34.*, but only on FTP, SSH, SMB, and RDP ports.
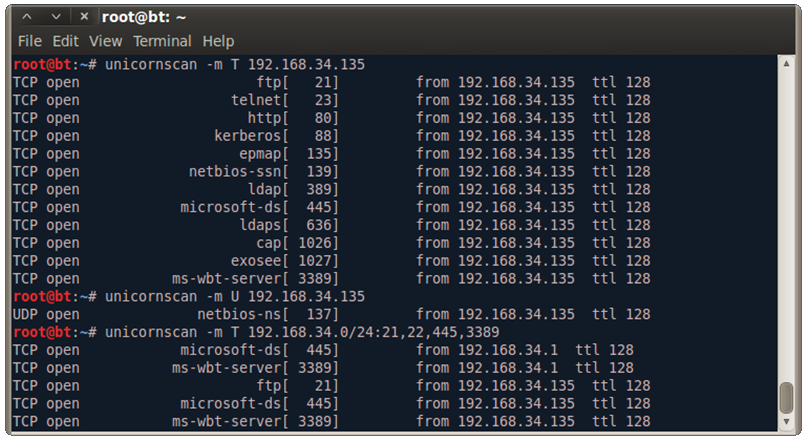
Figure 8
You can perform the same thing using Nmap. The command nmap 192.168.34.135 scans TCP common port; if you add -sU option it will scan UDP ports. The single target can be replaced with 192.168.34.*, 192.164.34.0/24 or your hosts.txt to explore all subnet or specific IPs; adding the option
-p 21-23,3389 you will limit the scan to port 21, 22, 23 and 3389. The result will be probably the same but if you try Nmap you will see more information. In addition, it can be quickly implemented to determinate what kind of program is listening over the port discovered (-sV) and what operating system is installed (-O). Please, take a look at the Nmap help to learn more options and remember that man command or help are always your friends. If you are afraid to use the Terminal, use the Nmap GUI: Zenmap.
You have to remember that every GUI is at least one layer over its command-line program; anyway let’s use the graphic interface of Nmap and try to find FTP, SSH, Telnet and RDP services in the subnet (Figure 9).
Scanners make a list of hosts using FTP, another one of hosts using RDP, and so on.
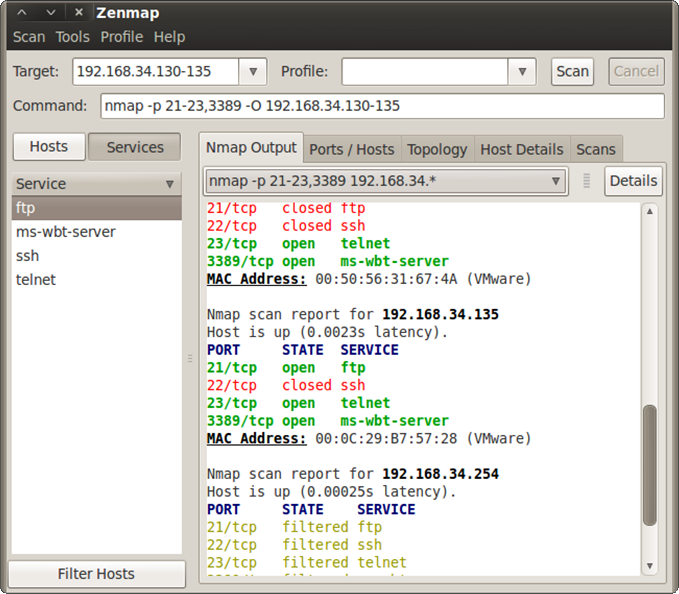
Figure 9
Get the Keys
Well done! You have completed your basic network gathering phase, now you can merge all your lists and launch your first attack. What do you need? A username list, a file listing hosts with the specific service, a password list, and a program to put everything together. You don’t have the password list, but one can be easily found in the folder /pentest/password/wordlist/ or by a search on the Web. The kind of attack you will do is called ‘wordlist attack’: it is not the most elegant way to perform a penetration test, but it may be very incisive.
The program you can use to join your lists is Hydra (or its GUI xHydra). Figure 10 explains how it works.
Open the Hydra GUI (Privilege Escalation > Password Attacks > Online Attacks > Hydra-gtk)
and, in the Target tab, insert the target list (e.g.FTP_hosts.txt), the port to test and the protocol (21 / FTP).

Figure 10
The options ‘Show attempts’ and ‘Be verbose’ are useful to better understand what the program does. Go in the Password tab and insert the user and the password lists; don’t forget to check ‘try login as password’ and ‘try empty password’. For a basic test don’t use Tuning and Specific tabs; move to the Start tab and run the attack. It takes a while, but I Hope you can find some user and password association.
You can also try to extend your lists to have more chances, but remember that such attack may take a very long time. In a pen test you must have a very strong reason to spend 8 or more hours for a word list attack.
Anyway, if you find some associations, write them down and be ready to reuse it: users are used to use the same password for more than one service.
You can start to write a file with user:password, you will use it on Hydra in the Password tab instead of users and passwords lists. When you discover a new service, you can first use Hydra with the new file created and then the lists of users and passwords. This will speed up your work.
I hope you now have the user/password to access the FTP, SMB or, if you are lucky, the SSH, or RDP.
This is not the end of the test, this is the beginning. You will use this access to gain more information and to find more vulnerability all over the LAN.
But what about if you can’t find anything? Don’t worry, these are just the first arrows in your quiver. After these, you can try many other things such as web vectors, exploit some vulnerability, or ARP poissoning. There are so many options that the only limit is you and every discovery is the start for the next one.
So when you open a new port, restart from the beginning, restart from sharpenning your axe.